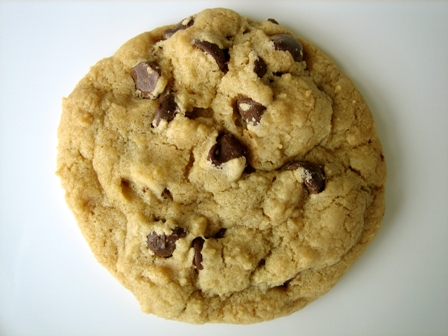
In my quest over the years for the perfect chocolate-chip cookie, I had narrowed my criteria down to a few things:
- They have to be chewy
- They have to be thick
- They have to have plenty of chunk to them
- They have to be a cookie texture. [i.e. not cake-y]
But there was always something wrong. I'm sorry, dear Nestle-Tollhouse, but your recipe does not cut it. There was also the strange problem of the cookies turning out a different way every time. Sometimes they were just hard little balls. Other times it appeared that there was a steamroller in my oven running back and forth across the cookies. And once,
once in a midnight-blue moon I'd get it. The ideal cookie.
Then I started baking as a business. We wanted to sell chocolate chip cookies along with our other products, but I knew for a fact that our classic recipe just wasn't reliable enough.
Not only was her name simply adorable, her recipe looked smashing. So I printed it off. I tried it. I fell in love. Simple as that. These cookies are
it. They are fat. Chunky. Enormous. Everything we girls dread in ourselves but adore in a cookie. The secret? I'll quote
The Brown-eyed Baker herself:
"The secret to the thick and chewy cookies is the combination of using
melted butter, an extra egg yolk, and a higher ratio of brown sugar to
white sugar. Also, definitely follow the instructions for making jagged
edges on the top of the cookie – this gives them the crinkled and
craggly bakery cookie look."
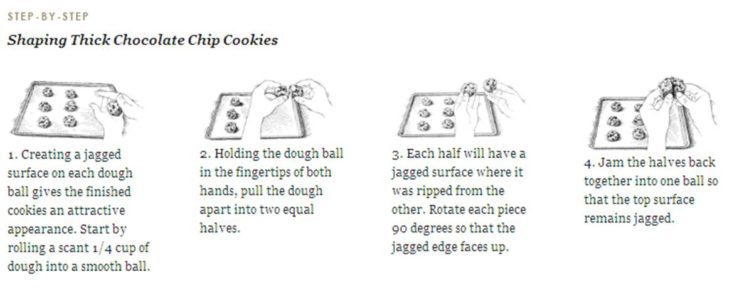
The craggly look, as I soon found out, comes from the fact that you roll your ball, then pull it in half. You'll have two squiggly sides, you know what I mean. Rotate the halves so that their squiggly sides point up into the air. Squish the bases of the two halves together and leave squiggles galore. Set onto the parchment paper and bake as is. This is the secret to having that classic rocky-topped bakery look. I was tickled pink when it worked, and I laughed my head off trying to show a friend how to do it. I've linked to the instructions for this craggle-top if you're still confused...
I've shared the recipe below as it is found on both her website, and Baking Illustrated, page 434. (Her source for this recipe)
Thick and Chewy Chocolate Chip Cookies
(Source: Baking Illustrated, page 434)
Makes about 18 large cookies.
These oversized cookies are chewy and thick, like many of the
chocolate chip cookies sold in gourmet shops and cookie stores. They
rely on melted butter and an extra egg yolk to keep their texture soft.
These cookies are best served warm from the oven but will retain their
texture even when cooled. To ensure the proper texture, cool the cookies
on the baking sheet. Oversized baking sheets allow you to get all the
dough into the oven at one time. If you’re using smaller baking sheets,
put fewer cookies on each sheet and bake them in batches.
2 cups plus 2 tablespoons (10 5/8 ounces) unbleached all-purpose flour
1/2 teaspoon baking soda
1/2 teaspoon salt
12 tablespoons (1 1/2 sticks) unsalted butter, melted and cooled until warm
1 cup packed (7 ounces) light or dark brown sugar
1/2 cup (3 1/2 ounces) granulated sugar
1 large egg plus 1 egg yolk
2 teaspoons vanilla extract
1-1 1/2 cups semisweet chocolate chips
- Adjust the oven racks to the upper- and lower-middle positions and
heat the oven to 325 degrees. Line 2 large baking sheets with parchment
paper or spray them with nonstick cooking spray.
- Whisk the flour, baking soda, and salt together in a medium bowl; set aside.
- Either by hand or with an electric mixer, mix the butter and
sugars until thoroughly blended. Beat in the egg, yolk, and vanilla
until combined. Add the dry ingredients and beat at low speed just until
combined. Stir in the chips to taste.
- Roll a scant 1/4 cup of the dough into a ball. Hold the dough ball
with the fingertips of both hands and pull into 2 equal halves. Rotate
the halves 90 degrees and, with jagged surfaces facing up, join the
halves together at their base, again forming a single ball, being
careful not to smooth the dough’s uneven surface. Place the formed dough
balls on the prepared baking sheets, jagged surface up, spacing them 2
1/2 inches apart.
- Bake until the cookies are light golden grown and the outer edges
start to harden yet the centers are still soft and puffy, 15 to 18
minutes, rotating the baking sheets front to back and top to bottom
halfway through the baking time. Cool the cookies on the sheets. Remove
the cooled cookies from the baking sheets with a side metal spatula.
* * * * *
My notes on this recipe are only a couple of things. First off, don't worry if the dough is goopy--you're melting the butter so it will be a little soft. You can refrigerate the dough for a few minutes if you like, though a little while on the counter will do the trick. Secondly, use parchment paper. I can't tell you how many times this has saved my skin! Third and lastly, bake only one tray at a time--that's probably the most important thing of all! :) So give these cookies a go and come back and tell me how they worked! I like using Nestle Chocolate Chunks instead of the chips--they only enhance the over-all rockiness of these beauties! -Rach


 For a long time I've needed to commit to a variety of Shrinkage Plan, but I don't like the idea of dieting. It seems so...pie-crust-ish. You know, easily made, easily broken and all that lovely Mary Poppins stuff. A change to your diet though--now that's different because it means you are actually eating healthy. Not depriving yourself of essential things like natural fats and oils and all that.