Showing posts with label diy. Show all posts

Saturday, January 17, 2015

The Essential Wedding Hair-Do Kit


After last post, there was sufficient interest in learning what I consider the Must-Haves in a wedding hair-styling kit for me to bother rounding up my supplies and taking pictures and putting them into a collage. Thanks for that--I wanted to do the post so you gratified my wish. I will now act important and show you the eight items I believe make up the (basic) Essential Wedding Hair-Do Kit:


  1. A curling iron: I have a simple, normal clamp-curling iron but I've heard that the curling wands are even better because you have the choice of how thick you want the curl to be! But honestly, a regular old clamp-iron works just as well when you know how to curl hair. Be certain, however, that you do know how to use it so you don't end up with a bunch of crimped ends and wonky ringlets.
  2. Wave-clamps: you never know when you'll be working on a headful of hair that does not want to curl. These clamps are helpful in setting the look. Immediately after taking the hair off the curling iron, swirl it up to the head and clamp in place until completely cool. Spray, then take down.
  3. Dry shampoo: I use Not Your Mother's "Clean Freak." Spraying this power into clean or day-old hair (which is easier to work with) provides a great base for teasing, poufing, and pinning. ALWAYS add dry shampoo or another texturizing product when working with updos.
  4. Hairspray: the Aussie brand is a good way to go. Volumizing spray is also helpful. Spray the HECK out of the bridesmaids' heads, but only after they've approved the look. It's hard to un-spray hair and you don't want anyone to walk around all day wishing they looked different. After spraying, refrain from lighting a match.
  5. A teasing comb: these combs have tiny teeth to help you get that va-voom in the styles. Backcomb gently for desired volume, then comb smooth the top of the hair, leaving a pretty little rat's nest beneath.
  6. Curved bobbies: though regular bobby pins work well in most hair, I'm a fan of these curved bobbies by Conair because they follow the contour of the scalp and are much more comfortable to wear. When the bride or bridesmaids are wearing fifty+ bobby pins, you want it to be as comfortable as possible!
  7. Clear elastics: a complete life-saver, you always want clear elastics to provide the stability of a hair-tie without the chunky color and visibility. You can easily find them in the hair-pin section of most stores. If for some reason you are having difficulty finding them, check the ethnic section. 
  8. Hand-held mirror: obviously helpful for letting your "patient" see the back of her head, a hand-held mirror is a delightful and often-forgotten addition to the essential wedding hair-do kit.
And there you have it! Portable, light-weight, and efficient, these eight items will insure your ability to create nearly any style from French twist to chic chignon, from vintage curls to sophisticated buns and up-dos. Of course you can always add items to increase efficiency or create a certain style. At last weekend's wedding, the bridesmaids had all received snowflake-shaped crystal pins meant to be worn in their hair. At another wedding, if a bouffant bun is desired you might bring a foam ring or a sock. There are always additions one can make. My list is intended to be a list of the basics I now know to be necessities for anyone on their way to lend an artistic hand on someone's big day. I hope this helps take the trepidation out of preparing to play beauty-parlor. Remember! "Wedding Season" is right around the corner. ;)

Thursday, December 26, 2013

DIY Audrey Hepburn Canvas Wall Art

Hello dear people!
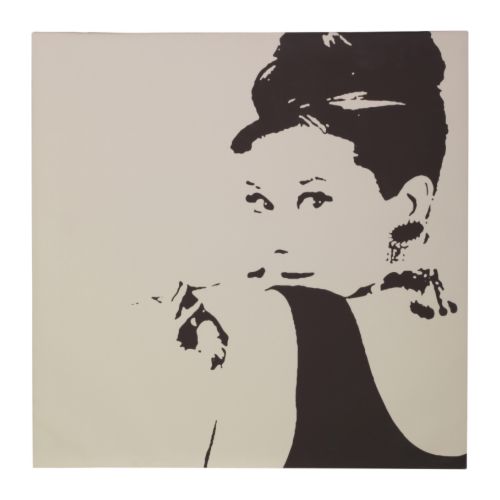
    I had the most lovely blog break and confirmed the fact that there are many hours in the day in which to do things I thought I didn't have time for. Among these things was the art of painting things! I am not a terribly fine artist--I don't dedicate enough time to learning to be so--but I do enjoy mucking about with paints now and then, and this month I was able to play with it! Besides the sort of composition that usually comes to mind when one speaks of "painting", I played around with canvas wall-art. I had been vaguely wanting something big and black and white and Audrey-themed. When I was clicking through Pinterest for DIY gift ideas, I came across this canvas-print from Ikea:
//Isn't she a beauty?//
As much as I love Audrey Hepburn and as much as I wanted this canvas print, I knew I couldn't spend $40 (not including shipping/handling) and then I walked into Michael's and saw a stack of seven 12x12 canvases for $20. As soon as I bought the stack for various gifts, I decided to use four to re-create/change this poster into something for My Lair. My vision was that image above projected onto four separate canvases that could be hung altogether, or a few inches apart, or even mixed up if I wanted a strange modern-art effect. (LET US DISSECT AUDREY, MUM!)

What followed was an "eye-balling" test-run on four mini-canvases. That round turned out pretty much a hot mess. I misjudged Audrey's mouth and nose and she ended up looking wretched. Vexed with the product, I didn't know if I wanted to use four of those canvases for something that would probably not turn out brilliantly. But I do have a stubborn streak. So stubborn, in fact, that I voluntarily made the choice to do it the mathematically.

Get that? 
Me.....and math....together.

I printed off the picture of the Ikea canvas which was about a 4x4 square, then folded it into quarters, folded those quarters into four-eight pieces each, and started taking it bit by bit with a ruler, sketching it onto the big canvases with painstaking precision. It was a really strange exchange: one entire "canvas" on my print-out only measured 1 inch which meant that I was multiplying by twelve (or dividing by twelve) to draw what I needed on my own canvases. 1/8" became 1.5" and I would measure angles in a way that blew my brain. I seriously have not done this much geometrical math since graduation...it felt powerful. ;) By the time I was finished with the 2+ hours of measuring and sketching, the thing looked pretty darn good, but I knew the final test would be painting in the shadows and seeing how it looked when finished. 

Guys...I think it looked pretty much amazing... at least, I am satisfied.


For me, the best part about it was trusting to math to make everything correct. Yes, I felt like I was making random angles and marks and blobs on a canvas (especially that darned left-hand piece!) but I knew that if I could just follow the mathematical measurements, it HAD to come out right...and it did! There is probably an easier way to do this project (a projector? Bwahaha) but I found that the satisfaction of doing something on my own without the aid of anything but a little 4x4 piece of paper, a ruler, and a pencil was worth all the inconvenience.

If you want to make your own art like this, you will need the following materials:

  • 4 square canvases (I used 12x12)
  • A ruler, your image of choice, and pencil
  • Acrylic paint and brushes
  • A fixative (I skipped this, but I have heard hairspray works to set the paint!)
Good luck! This is a beautiful, fun, chic project and makes a lovely conversation piece for any room. The size (50x50 the way I have it hung) is perfect for an empty wall, and I just love the....Hepburnism! 

Hope you enjoyed seeing my brain-child! I love interior-design/decorating

Monday, March 25, 2013

The Long-Awaited Coffee-House Part One! :)


I am sorry to have neglected this blog recently, but the truth is that the business of planning, preparing and executing two large fund-raising events within twenty-four hours of each other put quite a damper on all things blog-related. But I DID keep my tablet charged and I DID take pictures so there you go. I suppose I ought to start at the beginning because this isn't a very coherent update for those of you who aren't on Facebook and haven't been constantly told updates about our coffee-house fundraiser event and the following yard-sale.

Wednesday was a prep day with things like making the chocolate chip cookie-dough cheesecake, organizing piles of decor in the four categories: (Hipster, French, Coffee-Shop, and Vintage), and packing all the items for the garage sale in the garage. (A very large feat, that.)

The coffee-house was first. Thursday we spent the day cleaning the house, and in afternoon I swung out of our driveway, picked up Matthew and then drove to Petersburg to meet Josie and her momma. I also wore my awesome but hipster polka-dot sweater and straightened my hair. I look like such a kid when I do that!

We got home, unpacked, and spent the night watching This is the Army which swung us on with fabulous music till midnight. The we collapsed into bed, and the morning came way too fast for anyone's taste.

Friday morning.


I had a slight panic moment seeing how light it was when I woke up--I thought I had slept the day away. Turns out it was only 7:30 and I had nearly 12 hours to pull off my brain-child project. Josie was absolutely invaluable in boosting the skills and things that Sarah and I have in moderation. We would arrange a corner and it would look good, but then Josie would come, tilt her head, furrow her brow, rearrange something and it would look perfect. We totally rearranged the furniture, took down all previously existing decor, and re-did the house. So much so that when one of our team-guys came in he said, "Hey. You guys should keep your house like this. It looks really cool." That made me happy, because this guy is at our house at least every Sunday, and oftentimes in the days between.


Friday we literally spent all day on our feet. We felt like tree-toads, walking all over countertops and table-tops and using tape for everything. I swear tape is a modern miracle. Honestly. Scotch-tape held up 80% of our decorations! I ought to buy stock in the company and then go around demonstrating it as the party-planners best friend. ;) I'm going to do a whole post on the decorations and how we made what we made and how we spent not a red-cent, but I don't want to overload you so today you get the general push through of the weekend. One quick mention of our method, however: we asked for $5.00 at the door, and then priced the drinks and baked goods cheaply. The most expensive item was "The Neverland" which was a coffee milkshake loaded with whipped cream and sprinkles that cost $3.00. Funny thing is, that and the "Poor Edith" (a simple, plain caramel latte) were the most popular items. We made a killer off the Neverlands. Will definitely be selling those again if we do another coffee-house sometime.

The rest of the team arrived at 5:30 and we had nachos and then got down to business. (but we didn't defeat the huns ;) and I trained my team of baristas. There was a vaguely frightening moment when I started to doubt anyone besides the team would show, but then the people started streaming in and the kitchen filled up craziness from Justin, Daniel, Tim, Emma, Sarah, and I, and before I knew it people were leaving and it was 11:00 PM and we had made well over $200.00 from the thing! I was shocked and pleased when I saw how God had blessed our efforts! The whole time it kind of felt like grabbing at the wind because it was Sarah and I planning this thing kind of last minute and not knowing if it would fly, but God gave it wings enough. After everyone had left, Josie and I perched on hard chairs in the dining room (don't ask me why) and talked until at least midnight again. Wow....noticing a pattern here.


We tumbled to bed and were awakened before the sunrise to get the yard-sale set up and together.


It was supposed to start at 9:00, but people started coming at seven-thirty and didn't stop till 1:00. Again, the Lord totally blessed the method of the yard-sale. We stuck all the items in neat rows and told people  to make a reasonable offer and then pay up and take it away. By the end we had made at least $600 which brought our grand total for the weekend up to $870.00 which exceeded (by a bit) the amount we had gone into the weekend needing!


This means our trip is fully funded now! We are going to Romania and it is paid for and we will have an amazing time and we will come back!  Hallelujah, and a huge thanks to those of you who helped us all the long and tedious way to raising our funds! Those of you who came and donated your time and money (Josie! <3) and those who put effort and time into helping with the decor (Jill! <3) and everyone in between! This weekend was crazy and fun and hectic and I am exhausted now on this cold Monday morning, but it worked. To quote a very very sappy movie, "Never despise meager beginnings."

So thanks, ya'll, and stay tuned for a post with more pictures, awesome details, and How-To-Plan-This-Party-Yourself. :D

Wednesday, June 20, 2012

diy dizziness. :)

All right...so I admit that I'm a D.I.Y. fan. I have hardly ever done any one of the amazing ideas I've seen, but I hope to soon. :D Lately I've seen lots of inspiring ideas on Pinterest.com. Here are some of my favorites!
Just a headband, a lace applique, and a bit of fabric stiffener. Beaucoup d'elegance!
I have also been thinking of doing a headband like this, but with some of the peacock feathers I have in my room. (they are just sitting in a big bouquet right now--pretty, but useless. :)

Homemade finger paints! I've gotta make these as soon as Levi gets a little older. :)

These adorable candle-holders are made by soaking cloth doilies in a sugar-starch and then forming it around a blown-up balloon. Once the doilies dry, pop the balloon and there you have it! :)

Turning a colander into a lampshade! The reflections are awesome. :)

What a cool idea for natural, leafy art! So easy!

A place to use all that loose change lying around? Oh yes. :)

Awesome idea: Draw designs with Elmer's glue, let it dry, and then paint the whole thing one color. :)

This is an epoch in the life of Me. Look at that and tell me it's not brilliant! A fork bent into a picture-holder!

Melting crayons onto canvas. Wild, but beautiful! This would be adorable for a modern children's room, wouldn't it? I think I'd like to do it, just to melt the crayons and watch them dribble. :D

Paper birds & birdcages. Simply adorable.

And for all of us Southerners....

Iced-tea Popsicles! Pure genius. :)

I feel a string of craftiness coming on! :) What are some of the DIY's you are going to try? :)

Friday, April 27, 2012

DIY Face-Mud Sugar Scrub!


I made face-mud last night! For Christmas my aunt made sugar-scrubs for the girls and I. They were flavored (er...scented? I always end up tasting it :P) peppermint and lavender, and I loved them to pieces. Somehow it doesn't seem right to be rubbing your face with more oil than is already there, but I consistently saw improvement in my complexion and softening of my skin. :)

But then my sugar-scrub ran out.

And then I joined Pinterest.

And then I found a picture of face-mud and it intrigued me. What was it? From the picture I assumed one simply scrounged up some sand and soil and all that and rubbed then on their face. I mean...dirt has minerals, right? Or so my train of thought chugged along. So I did a quick Google search and found out that face-mud is actually a form of sugar-scrub.

"Ohyesocourse" (pssst. That's said in a Mr. Darcy voice, you know.)


Of course once I saw how easy the project was I knew I had to make it. Face-mud is a sugar-and-coffee scrub! Oh yeah! Perfect. I love sugar and I love coffee...and I know my skin will too. ;) adelynStone has complete instructions on the making of Face-mud. You can find them here if you want the whole to-do, but I'll go on and tell you how I did it. :)

DIY Face-Mud:
  • 1 cup sugar (I used brown but you can use white, natural, cane, etc.)
  • 5 Tbs. ground coffee (not de-caf. The caffeine is part of the skin benefit. :)
  • 1/4 cup oil (olive, canola, etc.)
  • 1 tsp. peppermint extract
  • 1 tsp. vanilla extract
Mix sugar and coffee together. Mix oil and extracts together. Add dry to wet ingredients and stir till moistened. If too soupy, add more coffee or sugar. Store in Tupperware containers.

It's that easy, and it smells divine! I used mine last night and went to bed smelling heavenly. I will warn you though, the coffee-grounds make rather a mess in the sink so be sure you rinse it out well after washing your face! This was such a fun (and cheap) project and would make an excellent gift for a coffee-loving friend. :)