Showing posts with label interior decorating. Show all posts

Thursday, December 26, 2013

DIY Audrey Hepburn Canvas Wall Art

Hello dear people!
    I had the most lovely blog break and confirmed the fact that there are many hours in the day in which to do things I thought I didn't have time for. Among these things was the art of painting things! I am not a terribly fine artist--I don't dedicate enough time to learning to be so--but I do enjoy mucking about with paints now and then, and this month I was able to play with it! Besides the sort of composition that usually comes to mind when one speaks of "painting", I played around with canvas wall-art. I had been vaguely wanting something big and black and white and Audrey-themed. When I was clicking through Pinterest for DIY gift ideas, I came across this canvas-print from Ikea:
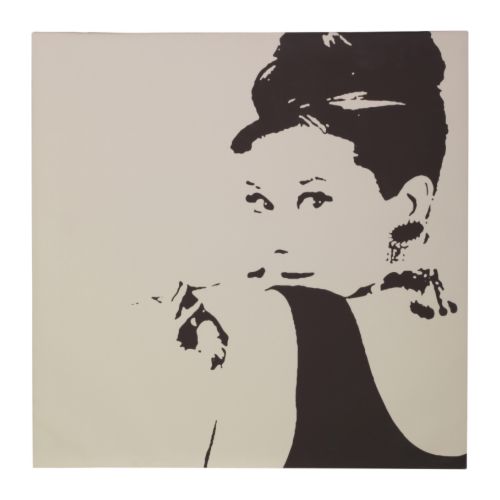
//Isn't she a beauty?//
As much as I love Audrey Hepburn and as much as I wanted this canvas print, I knew I couldn't spend $40 (not including shipping/handling) and then I walked into Michael's and saw a stack of seven 12x12 canvases for $20. As soon as I bought the stack for various gifts, I decided to use four to re-create/change this poster into something for My Lair. My vision was that image above projected onto four separate canvases that could be hung altogether, or a few inches apart, or even mixed up if I wanted a strange modern-art effect. (LET US DISSECT AUDREY, MUM!)

What followed was an "eye-balling" test-run on four mini-canvases. That round turned out pretty much a hot mess. I misjudged Audrey's mouth and nose and she ended up looking wretched. Vexed with the product, I didn't know if I wanted to use four of those canvases for something that would probably not turn out brilliantly. But I do have a stubborn streak. So stubborn, in fact, that I voluntarily made the choice to do it the mathematically.

Get that? 
Me.....and math....together.

I printed off the picture of the Ikea canvas which was about a 4x4 square, then folded it into quarters, folded those quarters into four-eight pieces each, and started taking it bit by bit with a ruler, sketching it onto the big canvases with painstaking precision. It was a really strange exchange: one entire "canvas" on my print-out only measured 1 inch which meant that I was multiplying by twelve (or dividing by twelve) to draw what I needed on my own canvases. 1/8" became 1.5" and I would measure angles in a way that blew my brain. I seriously have not done this much geometrical math since graduation...it felt powerful. ;) By the time I was finished with the 2+ hours of measuring and sketching, the thing looked pretty darn good, but I knew the final test would be painting in the shadows and seeing how it looked when finished. 

Guys...I think it looked pretty much amazing... at least, I am satisfied.


For me, the best part about it was trusting to math to make everything correct. Yes, I felt like I was making random angles and marks and blobs on a canvas (especially that darned left-hand piece!) but I knew that if I could just follow the mathematical measurements, it HAD to come out right...and it did! There is probably an easier way to do this project (a projector? Bwahaha) but I found that the satisfaction of doing something on my own without the aid of anything but a little 4x4 piece of paper, a ruler, and a pencil was worth all the inconvenience.

If you want to make your own art like this, you will need the following materials:

  • 4 square canvases (I used 12x12)
  • A ruler, your image of choice, and pencil
  • Acrylic paint and brushes
  • A fixative (I skipped this, but I have heard hairspray works to set the paint!)
Good luck! This is a beautiful, fun, chic project and makes a lovely conversation piece for any room. The size (50x50 the way I have it hung) is perfect for an empty wall, and I just love the....Hepburnism! 

Hope you enjoyed seeing my brain-child! I love interior-design/decorating

Wednesday, June 20, 2012

diy dizziness. :)

All right...so I admit that I'm a D.I.Y. fan. I have hardly ever done any one of the amazing ideas I've seen, but I hope to soon. :D Lately I've seen lots of inspiring ideas on Pinterest.com. Here are some of my favorites!
Just a headband, a lace applique, and a bit of fabric stiffener. Beaucoup d'elegance!
I have also been thinking of doing a headband like this, but with some of the peacock feathers I have in my room. (they are just sitting in a big bouquet right now--pretty, but useless. :)

Homemade finger paints! I've gotta make these as soon as Levi gets a little older. :)

These adorable candle-holders are made by soaking cloth doilies in a sugar-starch and then forming it around a blown-up balloon. Once the doilies dry, pop the balloon and there you have it! :)

Turning a colander into a lampshade! The reflections are awesome. :)

What a cool idea for natural, leafy art! So easy!

A place to use all that loose change lying around? Oh yes. :)

Awesome idea: Draw designs with Elmer's glue, let it dry, and then paint the whole thing one color. :)

This is an epoch in the life of Me. Look at that and tell me it's not brilliant! A fork bent into a picture-holder!

Melting crayons onto canvas. Wild, but beautiful! This would be adorable for a modern children's room, wouldn't it? I think I'd like to do it, just to melt the crayons and watch them dribble. :D

Paper birds & birdcages. Simply adorable.

And for all of us Southerners....

Iced-tea Popsicles! Pure genius. :)

I feel a string of craftiness coming on! :) What are some of the DIY's you are going to try? :)

Saturday, December 31, 2011

In Which The Lass of All Trades becomes an Interior Designer...

The new year has not even begun and yet my work is very much cut out for me already! I have adopted a number of rehabilitation projects around the house, and I can't wait to begin! This will be my Course of Interior Design [on a budget) for the year, and I have many ideas. My sisters doubt my ability to pull it together, but I'm determined! Project No. 1 is....
The room over the garage. This past year it has been used in a number of manners, including miscellaneous storage, gift-wrapping area, catch-all, and Produce Refrigerator during the heat of the summer. (It has it's own a/c unit) Needless to say, it's needing major overhaul. The reason I adopted it? I plan to turn it into A Growlery of sorts--a sewing, crafting, girls' room that will be entirely for us! (when not in use as a refrigerator. :P) I have discovered that my favorite style of interior decorating, even more than Victorian, is Shabby Chic--sort of an antique, casualized version of French Provenance. :) Here is some Pinterest inspiration for the project:
Shabby-Chic gloriousness...
Must-haves. I am so going to copy this idea!
I adore those upper shelves! what a cool way to use a sloped roof!
Gotta love this chest of drawers! It'd be perfect for keeping fabric and odds and ends!


I am hoping to do something along the lines of this cute little garland in the room, somehow

My only nemesis(s) in this project is/are the problems of that room most likely needing to be used (at some level) for storage still, as well as the fact that the ceiling slopes at an angle, starting about waist-high, so vertical wall-space is limited. :)
The angle of the ceiling is very much like this, as well as the window at the end. :)
So that's the deal for the first project. Project No. 2? It has something to do with this:

An ancient Singer treadle-machine

Turning into something along these lines:

 Yes, I'm going to be converting the dead treadle-machine into a cute writing desk. (Dad's going to help me with that. :) So, what are your projects for the new year?