Showing posts with label tutorials. Show all posts

Saturday, May 31, 2014

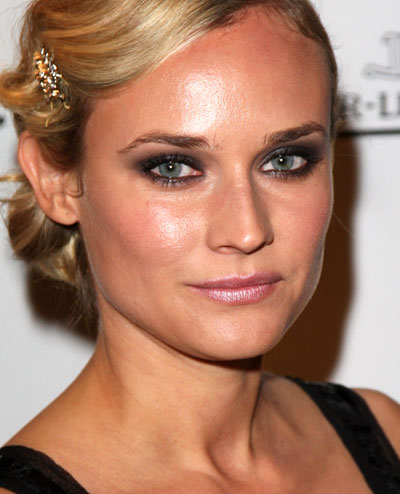
Smokey Peacock Formal: A Makeup Tutorial

I began this look as another Plenilune look, but basically it turned into something I'll just label the Smokey Peacock Formal and leave you free to apply it however you choose. It would be a lovely look for some sort of gala event, while it is still simple enough to wear for a work day if you were going to switch from one to the other without time to change makeup.


//The Eyes//
I began by dabbing a little concealer under my eyelids and swiping primer on the top of the lids. I'm not fancy with my primer: it came in an NYC makeup set and is sitting there right beside the shadows and a little pan of highlighter. Primer is, however, really helpful for "setting" a look, especially when it is smokey and might sort of peter out halfway through the evening without a little help. For this look, I started in the inner corners of the eyes with silver, then worked my way across the lid in lilac, dark grey, and cranberry, finishing the deepest part of the creases with a dark purplish brown. (All of these colors came from an all-purpose smokey-eye palette, plus a Smokey For Green Eyes palette from NYC) I lined my eyes all the way around with black (including the very inner corners), and underlined the bottom lid with silver to brighten the look. I filled in my brows a little with some brown eye-shadow too. You can't see terribly well in these photos, but at the far corners of the eyes, I brushed some peacock blue to shock some light back into the dark. Just a little, just enough to make it a playful rather than high-drama look.


I have never tried an entirely black smokey eye because I have heard that such a thing makes green eyed women look washed out. I'm not certain this is true, but then again, I've never been a major fan of the Abigail Chase Meets Raccoon look. I'm quite content with a reddish or purple palette. Works for me. :)


//The Face & Lips//
A quick puff of Mama's blush along my cheek-bones and the face was done. God has blessed me with a generally pretty clear complexion so I don't worry too much about doing anything with powders and foundations and things. For my lips, I used Laqa & Company Lip Lube in Purple. I either needed to go nude with the lip color, or something Not Pink. Purple? Perfect.


//The Hair//
For a bit of drama, I finger-combed my hair to the opposite side of where I usually have it, and pinned it into a haphazard coil into which I stabbed a gold dogwood flower. 


And there you have it! An interesting, beautiful look for your daytime-to-evening wear. Tra!


Monday, February 18, 2013

Knotty and Nice: 7 easy hairstyle tutorials

This post is for Livia Rachelle, and for any of the rest of you girls who wonder about new and interesting ways to do your hair, or the way I do mine. More often than not, people will look at the way I do my hair and sigh and say:
"I could never get my hair to do that!"

And ladies, I'm a firm believer in the fact that such groanings and moanings are a lie. You can do what I do with my hair, because face it: I'm a busy girl with little time and never-enough-hairpins who can't stand to use hairspray or straighten or curl her hair. Which means that the rest of you can do exactly what I do with my hair--and more. 

My #1 secret to gorgeous hairstyles?

The Knot. 

I use either of two knots:
The one-strand knot: (i.e. loop it around your fingers and pull the end through)
The two-strand knot. (i.e. like the start of tying your shoe-laces.)

I don't have exceptionally long hair. It's about to the middle of my back or a little higher.


I would say my hair is completely average: average texture, thickness, length, and all. So keep the faith up! 
In the rest of this post I'm showing you 7 different hairstyles built entirely off of either of those two simple knots. All you will need are some bobby pins and occasionally a hair-band.

Okay! Let's start!

#1: The Knotted Pony-Tail.


I brought both sides of my hair back and tied a two-strand double-knot. Like what you do when you're tying your shoes extra tight. Then I fastened the bottom with a pony-tail holder and voila! It's finished. Very cute, and a great way to take up length in your hair during the summer!

#2: Half-Up Knot


I took one strand from either side of my head and tied a two-strand knot, then pinned it against my head, leaving the rest of my hair down. This is a really pretty, really simple style.

#3: Sweet Vintage Knot


I did this one very quickly and without enough hairpins so the bottom is slumping. But as you can see I did the exact same thing as the half-up knot, I just used all my hair and tucked the ends beneath the bun as I pinned. :)

#4: The College-Knot


For this perky, preppy style just gather your hair into a really high ponytail on the  crown of your head with a hair-band. Take the hair and twist it into a long rope, then tie the rope in that one-strand knot, tucking the ends under the rest and pinning in place! 

#5: Double-Knots


Divide your hair in half, and tie each half into a single-strand knot. Pin the knot in place, and the let the ends stay down. This is a very cute style I just invented today, and rather like. ^.^ It makes me feel sporty, which is about the rarest feeling for this girl to have.

 #6: Romantic Knots


For those of you who love Downton Abbey, listen up, because this is a style that could easily go for a Downton-esque outfit. This seemingly complicated (and rather formless style, since I was in a rush) is made up entirely of one-strand knots. Literally that's all you do. Tie a bunch of knots all over your head and coil the ends around, and pin them in place so they don't die and flop and unravel. Just knots. I think I made about six. Easy as ABC.

#7: Low-Slung Knot


This is just a single strand knot incorporating all my hair. I gathered the hair into a my hand, twisted it, tied it, and tucked the ends before pinning. I like this. It's casual, cozy, and cute all at once. :)

Simplicity.

So, girls, these seven styles are just a couple of the ideas I came up with in the half-hour or so I spent messing with my hair this afternoon to formulate this post. The Knot is one of the most versatile hair-styling techniques, as it can be styled tight and preppy or loose and romantic. 

Try these, or styles of your own, and let me know how they work out for you!

Wednesday, January 16, 2013

Best Foot Forward Challenge: Day 3


So today the main event was to try out the flaxseed hair gel I made yesterday. Mama and sisters were very very dubious as to how it would work. I was determined, but had no idea if it was a good idea or not. But it's something I have wanted to try for some time, and this is what "Dressing up to Knock Around the House" days are for, right? Trying things out here in case they won't work there? This morning I got up, showered, and ran the gooey-goop (it looks exactly like the cave trolls' "floaters", btw) through my hair, and scrunched it repeatedly.

Did it work?

You judge: 


I honestly think it did. If nothing else, it smoothed my frizz and made my hair kitten-fur soft. I'm not kidding. This is the best junk I've ever put in my hair. (Not that I've used much gel, but you know.)

And because I know you're asking, here's the recipe:

Homemade Flaxseed Hair Gel

1/4 c. flax seeds
1 c. water
1 tsp. coconut oil

Boil all ingredients together till it becomes the thickness of unwhipped egg-whites. Remove from heat, give a good whisk once or twice, then strain and keep in a jar in the fridge. You can add essential oils (I didn't have any on hand) and you can re-use the seeds over and over to make more till they won't get gooey! Isn't that awesome? It made me happy to hear it. :) 
To use, just apply liberally in your hair and scrunch the curls. Let air dry. This doesn't make your hair crunchy at all, and the coconut oil moisturizes!

Now for the rest of the outfit:


 Leah laughed at my post in the full-length picture, but it's grey and rainy again, and the only place to take the photos was on the front porch, and it was not working out so finally I struck a  "Take that...HOMEBOY!" pose and got the picture. Hence the inner-city tossing of the hands.

 And the bare feet. Or perhaps that's because I'm a country bumpkin now.

Pardon the idiotic expression on my face. I was attempting to show you my makeup, and when I smile my eyes have a habit of crinkling up so you can't see my makeup. I used Loreal "Desert Rose" palette, I think--basically browns. I sprayed on a little "Innis Moonlight" to make myself smell nice. :D

Because the whole outfit was feeling brown, I added NYC "The Red Hots" Duos (the tangerine side) lipstick. :) A gold bracelet, gold watch, black and crystal bracelet, and matching necklace and earrings finished the thing. 


Ohhhhh dear. This gets funnier the longer you look at it. On the bright side, my complexion is marvelous. I am wearing no foundation or concealer or blush. (Thus I'm a little pale, but oh well.)


The dragon-hoard bracelet goes on the other arm, but that arm was the one holding the candle. What can ya do? Nothing.
What is your outfit for Day Three?


Thursday, January 10, 2013

Hairstyle Tutorial: Lady Mary-esque

The Downton Epidemic has not left our family unscathed. We were very very late to the Downton game, and only just crammed seasons 1 & 2 into the weeks between Christmas and now. :D After hearing some awful things that happen to favorite characters in Season 3, the jury is still out on whether we'll continue or just leave it at the hopelessly wonderful ending to Season 2.


At any rate, if the story of Downton wasn't enough, the costumes and hairstyles are gorgeous, world without end, amen. That being said, I've been thinking a deal about Downton-inspired styles, and when I threw my hair up this morning, I thought I'd take a picture and show you how you can add a little Lady Mary flair to your twist-up. :)


Do realize that I was not intending to recreate one of Lady Mary's hairstyles--this style is simply a nod to the Edwardian period in general, and Cora, Sybil, and Mary (not the mention Aunt Isobel) wear similar styles. And though I'm far and away from being as pretty as Michelle Dockery (Lady Mary), I thought the style turned out pretty well. :) 

I started with the basics I learned in this video:


But I didn't have time to curl my hair beforehand, and I didn't tease the front. Instead, I parted my hair to the side and twisted two strands together, then pinned it behind. The rest of the hair I did exactly as the video showed. I finished by slipping in a hand-painted Russian barrette. Voila! A soft, black shirt, a long pearl necklace, a pair of coordinating earrings, and you have an outfit even the Dowager Countess would approve of!


Aaaaand the side. At this point I had changed twice while wearing my hair up, so it was a bit fuzzy and the pins were showing. I didn't bother spraying my hair for a day at home. :P


Have you been inspired by Downton in your fashion?

Monday, January 7, 2013

The Perfect Cuppa Checklist


Two thing have inspired this post.

Are you surprised?

Because of course, for me, it's never simple, is it? Never just one idea. Well. The two things that inspired this post were (1.) Forgetting I had made a cuppa and coming downstairs to find it cold. (2.) Reading Dead as a Scone and The Final Crumpet by Ron and Janet Benray. (Both of which, incidentally, are about tea.) Perhaps I might also honestly proclaim that this post was inspired by my love of tea, my spastic brain, and the fact that my toes are very cold right now and if I wasn't feeling "partickly" like a lazy bum, I would make some tea. That being said, ladies and gents, here is my tried and true Perfect Cuppa Checklist

Brewing the Perfect Cuppa


Most of us are not fortunate enough to have access to loose-leaf tea and strainers and all that lovely jazz and rigmarole that makes Brits turn their noses up at the American populace. They rightfully think we don't know how to do a proper job. That may be true in part and is all very well in theory, but certainly tea is a beverage that even we rebels deserve to drink? I've been a consumer of tea for a long while, and I know just the right way to do it. (Though the British probably frown on my practice of sugar and cream.) But too many times I've had cups of tea that were brewed by a scullery-maid who had been reading a penny-dreadful and cried her eyes out the entire time instead of watching the tea properly. I jest, of course, but great Scot, it's not often one encounters a real good cup. See, a proper cuppa isn't a watery beverage. Once you add the cream, it's almost as "thick" as coffee, and nearly as strong. So, to brew the perfect cuppa, here is what you will need:

Boiling water. 
Not hot. Boiling. 

"Unless the kettle boiling be, pouring the water shall spoil the tea."

Tea:
(My two favorites)


Natural Cane Sugar
(very important! I like demerara or turbinado best)

Half n' Half or Cream

A Tea Pot

A Tea Cup
(I do not allow you to drink tea out a mug. Silly business. Horrid. Only if you absolutely must. But it ruins the flavor, I'm convinced.)


Step One: Make sure your water is at a rolling boil. I promise you, this is important!

Step Two: Heat your tea cup and tea pot by rinsing them in hot water. This will keep them from cracking upon being filled with boiling hot water.

Step Three: Place however many bags you wish in your tea pot. I estimate depending on how many cups I wish to brew. Basically, a bag of P.G. Tips is generally good for a teacup and a half of tea. If my pot holds about eight teacups-full, I put 4 or 5 bags in the pot.

Step Four: Let it steep. You need to have the lid (and spout, preferably) covered so that the steam laden with lovely tea-leaf-oils doesn't escape. You want that the stay in the pot. Let the whole pot steep for 6-8 minutes. The stronger the better, if you want to do it properly.

Step Five: This is a tactic I read about in Dead as a Scone, but apparently the chemistry in a cup of tea is different (and improved!) if you add the cream to the cup before the tea. That would put Step Five as Pour a bit of Half n' Half in the bottom of your teacup. A couple of teaspoons should do the trick, depending on strong your brew is.

Step Six: Add the steeped tea. Your cuppa should be a lovely caramel color at this point. 

Step Seven: Add sugar to taste. Natural cane sugars like demarara or turbinado add the most amazing flavor to your tea. Don't use white sugar (even though the sweet little cubes are tempting!) and don't use honey (it changes the whole experience).

Step Eight: You are almost there! The only thing left to do on on our Perfect Cuppa checklist is to get a good book, find a spot near a sunny window, and rest a bit.

Enjoy your cuppa slowly! Life's too short to gulp your tea. :) 


"There are few hours in life more agreeable than the hour dedicated the ceremony known as afternoon tea."
-Henry James The Portrait of a Lady


Tuesday, October 2, 2012

All the possibilities!

Hello lovelies! 

Here's me being busy again with a lot of writing: blogging, novels, devotions, and researching for the classes I'll be teaching at Camp. I'm really excited this time: I'm assisting in the hair-cutting/styling class and spear-heading the hair-do half. :) Unfortunately there isn't internet access up at the camp (or the girls aren't supposed to use electronics during the week for sanity's sake) so I can't just direct them to my Pinterest board. Ha ha.


That means I get to put together a notebook of all my favorite hairstyles. I'm also typing up a sheet of hairstyling-links for the girls to take home, and I thought I'd share the links with you for your own hair-happiness. Oui? Okay.


ebeautyblog.com -video tutorials for casual/formal styles

Rapunzel's Resource- picture/ video tutorials {especially for long hair}


Two's Company: a double-take- several historical copy-cat styles I linked to a few posts ago...

A Beautiful Mess- lots of hair tutorials here!


I had to laugh over my hair today. First off, it's like 85 degrees here and humid as a greenhouse--can't tell why when it's been so beautiful lately. ANY-how, this no-way sets my hair up for a good time. Then I get in the shower and find that the little container I'd assumed as shampoo turns out to be conditioner.

I knew we were running low, but not that low.

My only choice is bar-soap or the guys' Axe Body-wash....

I go for the body-wash.

Guess what?

Yep. Best hair day I've had in a month.

Go figure that one....smooth, silky-soft, and way less frizz than I'd even hoped for on a day like this.

Saturday, January 14, 2012

Hair-flower Tutorial: "The Authoress"

"The Authoress"
It seems that hair-flowers are all the rage recently. I hadn't jumped on the fad until a few weeks ago when I designed and made what I've termed "The Authoress" hair-flower. It's a very simple, very smart-looking addition to an out-fit, and as several people have wondered how it is done, I've put together a tutorial on how to make your own Authoress Hair-flower. :)

What you will need for "The Authoress" hair-flower:
  • A large bobby-pin
  • A small wire hairpin
  • Pages of a book (or other paper)
  • A cute button
  • Glue
  • Scissors
It all begins with Opera and Poetry. ;) 

 Actually, this was an old poetry book my brother rescued out of the trash for me...I used it but it finally fell apart. Rather than throwing such a precious volume away, I decided it would serve its purpose very well in different projects. That's how I got such cute paper for this hair-flower. But really, you can use any kind of paper--it won't have quite so much authoress to it, but that's okay. [The Opera part is just what I happened to be listening to. Norma, in fact.]
Step One: 
Cut out 7 or 8 flower-shapes of graduating sizes. The largest  will be the base of your hair-flower.

Step Two:  
Cut out 5 or 6 decorative-edged circles. I did these with a pilfered pair of scrapbook-scissors. ;)
Step Three: 
Begin stacking the shapes--a flower or two, a fancy circle, another flower or two, etc. Glue each layer with a small dot of glue in the very center. For the first flower I made I actually sewed the layers together. It was a bit much for my poor finger-tips, however, so I went with glue this time--it worked perfectly well.


 The first two layers--
I like to shift the second flower-shape so its petals go in the spaces in between the previous layer's petals. It gives the over-all appearance more fullness.


Here is the finished stack of shapes, all glued together.


 Now you'll need one large bobby-pin (I use roller pins) and a hair-pin.

 Step Four:  
Trim off the "ball" ends of the hairpin and stick the hairpin's "legs" through the bottom layer of the flower. Spread out the "legs" like a brad, leaving a little hump of wire on the back of your flower.

 Step Five:
Bend the edges of the petals forward, so your flower looks like its blooming. :) 

(see "Paul Revere" on the top layer? The British are coming!!! :D)

Step Six:
Slide the top "foot" of the bobby-pin through the little wire-hump.


Step Seven: 
Glue a button in the center of the flower. I used a black-velvet button to coordinate with the colors of the hair-flower, but you can use any kind you want! :) Just be sure it isn't a shank-button--that won't lay right.


 There you have it! A lovely hair-flower: Romantic, vintage-looking, very smart, and entirely fashionable. I hope you enjoyed this tutorial, and I'd love to see any flowers you make using it. :) In the picture I had just washed my hair and hadn't done anything with it, but I could see this flower gracing a super-cute up-do as well. :)